Interested in learning more?
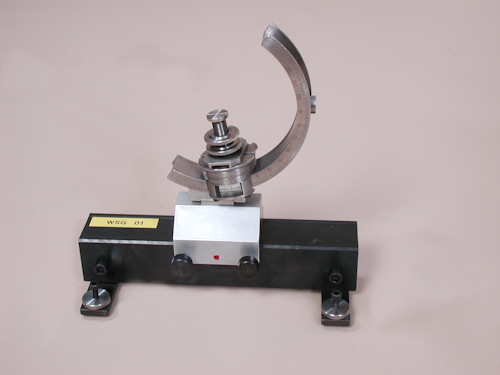
WSG-01 Goniometer
Application
The WSG-01 goniometer is designed for specimen orientation when cutting along the desired direction is required.
General Characteristics:
The WSG 01 goniometer is used to hold samples in the process of orientation using scale or different methods such as Laue photo, laser beam reflection, optical method, and cutting on high precision saws. A sample can be rotated 360° in one axis with 0.1° vernier and 120° in second axis with 0.1° vernier. The goniometer can be fixed to the WS 22, WS22B or WS 25 wire saw. The WSG 01 goniometer is constructed of stainless steel. The scales are deeply engraved. The specimen is cemented to a mounting table, which is the central element of the goniometer. There are precision rises available to center the specimen in the goniometer. The table can be moved up to 10 mm on either side of center to realign the crystal with the goniometer axis.
WSG-02 Goniometers
Application
The WSG-02 goniometer is used to orient specimens when cutting is required along desired direction after orientation using either X-ray or optical orientation techniques.
General Characteristics:
The WSG 02 is a semi three axis goniometer. A sample can be rotated 360° in one axis with 0.1° vernier and 120° in the second axis with 0.1° vernier. The second horizontal axis is equipped with fine adjustment with vernier of 0.5′. There is also fine adjustment of vertical axis rotation in the range of ± 10° with vernier of 0.5°. After specimen orientation, the goniometer can be mounted on the WS 22, WS22B or WS25B wire saws for subsequent processing. The WSG-02 goniometer is constructed of hard stainless materials and anodized aluminum. The scales are deeply engraved. The specimen is cemented to a mounting table which is the central element of the goniometer. There are precision rises available to increase or decrease the height of the table for centering the specimen in the goniometer’s arc. The table can be moved up to 10 mm on either side of the center in order to realign the sample with the axis of the goniometer.
WSG-03 Goniometers
Application
The WSG-03 goniometer is used to orient specimens when cutting is required along the desired direction after orientation using either X-ray or optical orientation techniques.
General Characteristics:
The WSG-03 goniometer is used to hold samples in the process of orientation using scale or other different such as Laue photo, laser beam reflection, optical method, and cutting on high precision saws. A sample can be rotated 360° in one axis with 0.1° vernier and 160° in second axis with 0.1° vernier. Movement around horizontal axes is provided by scaled hand wheel enabling fine adjustment. The goniometer can be fixed to the WS 22, WS22B or WS 25 wire saw. The WSG 03 goniometer is constructed of stainless steel and hard anodized aluminum. The scales are deeply engraved. The specimen is cemented to a mounting table which is the central element of the goniometer. There is a possibility to mount a typical sample holder from WS 22/22B standard accessories.
WSG-04 Goniometers
Application
The WSG 04 goniometer is of the same parameters as WSG 02 but the center of goniometer axle is 15 mm lower. It is placed 98 mm over the track instead of 113 mm in WSG02. The mounting profile is wider for wide optical tracks as in some types of X-ray diffractometers.
WSG-05 Spherical Goniometer
Application
The WSG-05 goniometer is used when cutting parallel to the specimen’s face is required.
General Characteristics:
The WSG-05 goniometer is used to hold samples in the process of orientation using surface of the guideposts as a reference. Spherical design allows simultaneous 3 axes rotation. Specimen is either cemented to a mounting table or mounted with specially designed yoke. The goniometer can be fixed to the WS-22, WS-22B or WS-25B wire saw. The WSG-05 goniometer is constructed of stainless steel and hard anodized aluminum.


